Thursday, 12 September 2013

Simple Git Workflow for PowerShell Script Development

I create a lot of PowerShell scripts and source control comes in very handy for replicating the scripts to servers and managing versions and branches.

I discovered Git many years ago and it works really well for managing PowerShell scripts.

This blog article is a reference for the commands to manage a script repository.

The first thing you need to manage PowerShell scripts using source control is Git.   My favorite package for working with Git is the portable version of Git for Windows called msysgit.   Make sure you download the portable version, although there is nothing wrong with the fully installed version of Git.   There are many other popular 'Git for Windows' packages such as GitHub for Windows and Posh-Git.

Once downloaded, extract the files and run the 'git-bash.bat' file to get to the *nix based prompt.   Notice you will need to use forward slashes / rather than back slashes \ in your file paths including UNC paths.   Other *nix based tools are also available here such as 'ls -l' and 'rm' etc.


Once you have Git portable running you will probably need to copy it to any server or workstation that you will be writing scripts or creating repositories with.

The first thing you need to do in the Git bash prompt is tell Git who you are.   This will save your user name and email address for assignment to any commits you make withing a repository.   You do this with a couple of git config commands. Whilst you are configuring Git you may as well set the default push mode to simple as described here, otherwise a message will be displayed stating the default is changing in Git v2.0.

git config --global user.name = "Grant Carthew"
git config --global user.email = "your@emailaddress.com"
git config --global push.default simple

You will need to run these commands on each workstation or server you intend to run Git on.

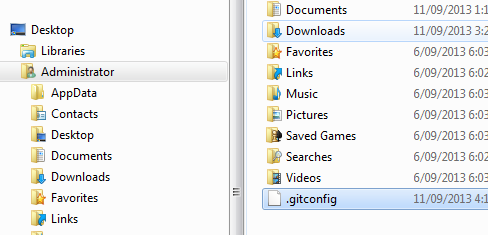
When you run the global config commands a .gitconfig file will be created in the root of your profile.   This .gitconfig file holds simple text configurations.


Now that you have Git configured for your workstations and repository file server, let's create a repository to host our PowerShell scripts.

On a file server create a shared folder where you wish to host your Git repositories.   I tend to create a folder called GitRepo.   This folder will be accessed using a UNC path such as \\FileServer\GitRepo.

Now on the file server using Remote Desktop, run the Git bash and change directory to the GitRepo root folder.   Within this folder create a new folder to host your PowerShell scripts and place a '.git' at the end of the folder name.   The '.git' extension is just a convention used for bare repositories.   Change directory into the new folder.   See the example in the screenshot below where I am creating a Reporting.git repository.


Now the fun part, time to initialize a Git repository.   The best type of repository to create on a central file server is a bare repository.   A bare repository does not host a working tree which is the Git name for the script files in the root folder.   The files in a bare repository cannot be edited because they are hosted in the Git object store.   One simple command will make a bare repository.

git init --bare


That's it.   You now have a starting point for hosting your PowerShell scripts.   Open the folder in explorer if you wish to see the folder structure that has been created by the init command.


There is nothing further to do on the file server.   Disconnect your remote desktop session to start working on your workstation.

Run the Git bash prompt on your workstation and change directory to the folder you would like to use for script development.   Do not create a folder for the new repository, git will do that with the clone command.

Now that you are in the correct folder in the Git bash, run the following command to clone the file servers repository.

git clone //FileServer/GitRepo/Reporting.git

This command will clone or copy the repository from the file server into a new folder.   In this case I am using a folder called Reporting.   Notice the '.git' extension is not included in the new folder name.   There will be a warning about cloning an empty repository which you can ignore.


If you open the new cloned repository in explorer you will see a '.git' subfolder which is where Git hosts all versions of files in the repository and other configurations.   If you ever want to remove Git from this folder, simply delete the '.git' subfolder and it is gone.


Now it is up to you to develop a heap of wonderful PowerShell scripts to weave magic across your server farm.   Once you have created the scripts in the new repository folder, it is time to commit them into Git.

One of the best commands in Git is the git status.   Run git status now and you will see the new script files you have created in the repository as untracked files.

git status


As untracked files they are not part of the repository and need to be added to Git.   This can be done using the git add command.   The easiest way to add all the new/changed/deleted files into the repository is to use the git add command with the parameters below.

git add . -A

The above git add command uses the file pattern of '.' meaning all files and folders.   The '-A' parameter is short for '--all' and tells git to add all files including removing deleted files.   The git add command will not save changes back onto the repository just yet, they are only staged.   Run a status command again to see the files staged.

git status


Now that the new script files are staged we can commit them into the master branch of the repository with the following command.

git commit -m "Initial commit for the Reporting repository"


The changed or new files are now committed to the Git repository on your workstation.   They have not been saved back to the file server yet.   Let's run the status command again just for kicks.

git status


As you can see from the git status report, Git now sees the working tree as clean because all the files in the directory are committed.   The git status command is great for letting you know if you have changed files.

You can keep working on your workstation script files if you wish but I tend to like pushing the changes back to the file server after every commit.   Because we cloned an existing repository from the file server there is no need to tell Git where the original repository is located.   To push the changes up to the file server simply type in this command.

git push origin master


From now on you can simply run 'git push' without the 'origin master' parameters.   You can continue working on the script files and commit the changes up to the file server following the same workflow above.
Here is a git status with a new file and a changed file.


So to add these changes into the local and remote (origin) repositories we do the following.

git add . -A
git commit -m "commit message"
git push


Up to now we have been building the repositories and developing the scripts.   To use the scripts on a target server you have some PowerShell Remoting options or you could get a copy of the scripts onto the servers.   I find a handy way of working with PowerShell scripts is to store them in a location on the server that is included in the Path environment variable.   This way you can call your scripts as if they are cmdlets.
To get a copy of our scripts on to the target machines we can simply clone the file server repository.

git clone //FileServer/GitRepo/Reporting.git


Once the files are cloned onto a server you can run the scripts or update the scripts creating more commits and pushing the changes back to the file server.   Note that Git is a fully disconnected utility so it will not tell you if the original repository, the one on the file server, has updated files.   Before you run any scripts in a target server repository, always run Git and do a git pull to bring down the latest changes from the origin.

git pull

In the following screenshot of the git pull command you can see I have merged the 'Usage' scripts into a 'Publish-ResourceUsage' script which involved deleting three scripts and renaming one.


All of the above work within Git is using what is called the 'master' branch of the repositories.   You can create branches for major changes without effecting the 'master' branch.

I am not going to explain branching in much detail here.   These are the commands you would use for branching just as a quick reference.

git branch webreports
git checkout webreports
*make crazy changes to your scripts*
git add . -A
git commit -m "Created the new web reporting script"
git push origin webreports
*happy with your changes?*
git checkout master
git merge webreports

It probably goes without saying that Git is not designed for PowerShell scripts.   It will work with any files you want to manage.   Once you start using it and become comfortable with the commands you could use Git to manage all of your scripting and programming source code.

In summary, Git has saved my bacon many times when working with large numbers of scripts and other files.
If you adopt Git two things will happen, you will start to love it, and you will be more efficient at managing your PowerShell scripts.

Lastly, be aware there are public Git hosts you can use for free.   Each have a subscription model.   I use GitHub for public hosting although I am not using it much yet.   For private Git repositories I use BitBucket.

[Edit 1] - I just read through this tutorial on Git and it is one of the best ones I have seen.   It approaches Git from a real world point of view and ignores some of the more complex features.


Monday, 2 September 2013

Windows Server 2012 Core Keyboard Input Method Changes

Here is an issue I just had with Windows Server 2012 installed as a server core system.   For those not familiar with a core install, there is no desktop with just a command prompt for managing the system.

As it turned out on this system I was trying to manage, the default keyboard input was set to the UK keyboard.   If you are using a US keyboard with a system set to the UK keyboard, some of the keys will be mapped incorrectly.   A very good example is the pipe symbol.   I was trying to use PowerShell to configure the server and discovered I could not pipe command objects.

Easy fix I would have thought only with Windows 8 and Windows Server 2012, Microsoft has moved the keyboard input configuration into the Metro start screen.   A server core does not have the Metro interface at all.

After some searching I found the best way to fix the problem.   One registry key change.
You can run the registry editor on the server core installations.   So simply run regedit.exe and navigate to;
HKCU:\Keyboard Layout\Preload and change the key titled "1" to the desired input method.   US is 00000409.

Here is some more detail about the registry keys;
http://support.microsoft.com/kb/102987/en-us


Tuesday, 27 August 2013

Public BTSync Secrets

Following is a list of BitTorrent Sync secrets I am using to share files with colleagues;

SharePoint Support Files
Read only secret: B3XNA62PYSAAH7LGKCIORW536DVG3OME2
This repository hosts information and files related to installing, configuring, maintaining, and developing for Microsoft's SharePoint.

Lync Support Files
Read only secret: BXJDISWQTV6S2MJKVCK3HBV3DDPXZR4TG
This repository hosts information and files related to installing, configuring, maintaining, and developing for Microsoft's Lync Server.

PowerShell Support Files
Read only secret: B5CQA6PNTYAMQCJBUBNB32XQV4WJGL2YQ
This repository hosts resources for working with Microsoft Windows PowerShell.

If you would like to get read write access to any of the above repositories to add to the resource, please contact me and I will send you the secret.

This list will expand as I add more repositories.


BitTorrent Sync Thoughts

Update: Don't use BTSync. Checkout SyncThing instead.

As I broaden my usage of BitTorrent Sync (BTSync) I am coming up with more and more ways of making my life easier with this brilliant tool.

Here is a quick list of ways to use BTSync;
  • Sync your photos from your phone to your desktop
  • Sync your music from your desktop to your phone
  • Backup your files
  • Deploy software development solutions such as websites or script files (PowerShell).
  • Share files with family and friends
  • Support your family and friends remotely (screenshots etc.)
  • Share files with customers
  • Sync your installed games to multiple machines

One of the problems I had when first using BTSync was the naming of the folders and where to store them.   After using it for a month I came up with a good name for the root folder where I place all my synchronised folders.   I now have a folder called "Pool" and inside are all of the folders being synchronised.


This Pool folder is used for simple synchronised folders while I have backups and other large synced folders stored elsewhere.

BTSync is only new and I started using it with a little apprehension.   Because of a build up of trust in the stability of BTSync over the last month I decided to start synchronising a large folder on my home file server.   My file server is running on a Raspberry Pi, so I had expectations that the indexing (hashing) process would be rather slow on a 900GB directory of pictures, music, documents and more.   As it turns out, the btsync daemon is crashing often.   It looks like the software package needs more resources than the Pi can deliver which is a real shame.   I am hoping bugs like this will get fixed as the product matures over time.

If you haven't given BTSync a spin yet, give it a go.   You may find it saves you time and gives you access to your files in ways you never thought of.

If you have thought of a unique way to use BTSync, let me know about it in the comments below.


Monday, 26 August 2013

Determine the Active IP Address on a Windows Machine with PowerShell

If you have ever had a need to install multiple NICs onto a Windows machine, or use a Virtual Technology like Virtual Box, it can be difficult to determine your local network IP address because of all the logical network interfaces.   It is easy enough to run the ipconfig /all command and see the results but to determine which IP address is being used to access remote networks by using a script requires a little work.

The best approach I could come up with was to use the Windows routing table.   If you run the "route print" command on a Windows machine you will see the default network interface that is being used to route traffic to remote networks. Using this information you can determine which IP address is being used as the source address when accessing remote networks.

I had a need to detect the local subnet on a Windows 7 machine and came up with the below script. It will return a PSCustomObject populated with the active network interfaces details.

Using three WMI classes being Win32_IPv4RouteTable, Win32_NetworkAdapter, and Win32_NetworkAdapterConfiguration I could determine the information I was after.

Firstly I retrieved the Windows routing table filtered to the default routes. This gets sorted by the metric and I select the route with the lowest metric. This gave me the InterfaceIndex of the active network interface. Using this index number I could retrieve the network adapter and its configuration.

To use this script either copy the text below into a new function or, as I do, copy it into a ps1 file saved in your path and call the file directly. Here is the Gist link: https://gist.github.com/grantcarthew/7000687


Thursday, 18 July 2013

BitTorrent Sync - My new favorite Private Cloud File Sync Tool

If you have been following my previous posts you will see a trend of late. I am heavily into file access and file storage for my personal use. I thought I had come up with a great solution for my own Private Cloud Storage which involved a Raspberry Pi, Samba, AjaXplorer and Deluge.

As of this morning I was informed that a product I was very interested in, but did not think suited my needs, now has an Android client. I am talking about BitTorrent Sync (BTSync).

When I first looked at BTSync and played around with it as a possible solution for my file access, I dismissed it because I was more interested in getting access to my file server rather than syncing to my devices. Using AjaXplorer I can access my home file server from anywhere with ease. What AjaXplorer lacked at the time was a desktop sync client.

Now that there is an Android client for BitTorrent Sync, I have the ultimate Private Cloud solution. On top of the Raspberry Pi, Samba, AjaXplorer and Deluge I now have BTSync to synchronise selected files from my home file server to my laptop, desktop or mobile phone. BTSync complements AjaXplorer rather than replaces it. AjaXplorer provides a beautiful web interface to all the files on my file server while BTSync keeps my frequently accessed files at my fingertips.

Better yet, on top of BTSync synchronising my frequently accessed files I have configured the new Android BTSync client to synchronise my phones DCIM (Digital Camera IMage) folder to my file server and desktop. Now if I take a photo with my phone it is automatically available on my file server for my wife to access and on my desktop for me to manage. Using my desktop I can delete poor pictures and generally manage my photos and the changes will be synchronised.

What about backups? The BTSync client has a trash folder and an archive (versioning) folder, but nothing beats a manual backup. Once a week I backup my file server to an external USB hard disk drive. I still have a Dropbox account and have decided to use it for only one purpose. I have my Android Dropbox client configured to automatically upload photos. I will forget about my Dropbox account unless there is some need to access the uploaded files.

I am not going to post on my blog about how to install BTSync because it is so easy to do on a running Debian system. See this forum post for details.


Thursday, 13 June 2013

Private Cloud Storage

I am a big fan of Dropbox.   I have been in the information technology industry for well over a decade now and my first smart phone made me very interested in the cloud storage solutions available.   It's not until you have a modern mobile phone that you realize how handy it is having your data available whenever and wherever you are.

So with my new HTC Incredible S purchased December 2011 I installed Dropbox.   I then proceeded to install other Dropbox clients on my Windows desktops and Linux desktops.   Low and behold my files just appear everywhere at the same time, perfect.

Then I learnt about Evernote.  At the time I thought Evernote was handy and complemented Dropbox quite nicely.   After using Evernote for a year or so and learning how to use it properly, I discovered the benefit of building an information architecture based around the Tags in Evernote.

So here I am in the year 2013 with some experience on personal cloud storage and I have found a few interesting observations about my use of these services.   Firstly, Dropbox is less important to me than it was to start with.   In fact when I look back now, it was never really that useful to me on my phone.   I found it very useful on my Desktop but not my phone.   Secondly, the information you want on the run is normally text.   Evernote is absolutely brilliant for handling text notes and photos that you want to use for research or reference.

I should add at this point that I don't like spending money on services if I can avoid it.   Call me cheap if you wish but I am a dad with four kids and my beautiful wife stays at home running the household and home schooling the bunch.   My children, wife, house and life in general will always be a higher priority for me than cloud storage and hence the finances get steered in that direction.

This is where Dropbox and Evernote now need to be compared.   Both Dropbox and Evernote are businesses and need to make money.   Both services need to attract customers to make their service popular and get support from third parties making their services even more valuable.   Dropbox chose the path of storage amount restrictions to cause customers to pay for their service while Evenote chose the path of storage traffic restrictions.

With Dropbox you get a fixed amount of storage for free.   At the time of writing this post that amount is 2GB.   You can get up to 18GB of storage for free if you invite a lot of people to use Dropbox.   If someone installs Dropbox from an invite you sent then, both you and the person you invite will get an extra 500MB of free storage.   If you use the Dropbox link at the very top of this post and become a member of Dropbox I will get an extra 500MB as will you.

Now the business model that Dropbox has is not bad.   If you love the service and need it for work or storing large amounts of data then you pay for a subscription.   If you don't need to store a lot of data, it is free.   Over years of use you will find they increase your storage quota also.   The problem is most people have many gigabytes of data stored somewhere and it will cost them money to store this in the cloud.   An example is my CD collection.   I ripped all of my CDs many years ago and having a little OCD when it comes to information technology I used a lossless codec.   This comes to 82GB of storage and only includes my music.   Add to that the videos, pictures and other documents it is going to cost me $500 a year to store it in the cloud with Dropbox.

How about Evernote?   Well Evernote could have chosen the same storage limit business model as Dropbox but they didn't.   They chose, in my opinion, a much better solution.   Evernote only charges you for traffic to their site and it is only accumulated monthly.   At the time of writing this post you can upload 60MB of data per month for free.   My quota used today is 2.2MB or 4% and this will be reset in 9 days.   What this means for someone like me is that the service is totally free and is unlikely to ever cost me money.   Does that mean that I am a leech on Evernote and not contributing to it?   Definitely not.   By using Evernote and blogging about Evernote and showing people Evernote to explain information architecture for SharePoint content types I am giving them free publicity.   I am making the product more popular.   I am one of the many millions of people who have the app installed on my phone adding support to its popularity.   Evernote benefits by supporting me as a free customer.

So where are we?   Well you have gathered by now that I am a big fan of Evernote and still a fan of Dropbox.   But I don't need Dropbox.   I have a 4TB USB hard disk attached to a Raspberry Pi at home and it has all of my files stored on it.   I have another 4TB USB disk I use to backup all of the files in case of hardware failure.   This file server storage I have setup has cost me only a minimal amount.   The Western Digital USB drives cost $198 each.   The Raspberry Pi cost $50 with a case.   So for under $500 I have massive amounts of storage that will last for a few years at least.

All of this led me to research private cloud storage.   I don't need Dropbox to store my files.   What I need is access to my files from anywhere.   I started researching open source private cloud storage solutions with the intent of replacing Dropbox but I learned after installing a few of them that I didn't want file sync on my phone.   I just want to be able to access the files.   Similarly I do want file sync for my desktops.

I started my private cloud storage research with ownCloud.   I tried very hard to love this open source product but found it very buggy.   In fact it has so many bugs it is unusable.   So I started looking at other solutions.   This Reddit post helped a lot with my research.

Here is a list of private cloud storage solutions I looked into or installed and a brief comment on each.
  • ownCloud 
    I installed this and found it buggy and poorly programmed for its primary task.
  • git-annex
    I am a developer and LOVE git, but this isn't quite what I wanted.
  • Seafile
    I installed this and was very happy with it except that the files are stored in a database format rather than just allowing easy access.
  • SparkleShare
    I was keen on this solution but I could not see an Android client on Google Play so did not install it.
  • BitTorrent Sync
    This is an awesome file sync tool but again, not quite what I was looking for.
  • SpiderOak
    This solution is not open source so I didn't really look into it.
  • Unison
    I didn't look into this solution at all.
  • AjaXplorer
    This is a brilliant browser and mobile file access solution with a desktop client on the way.
 After evaluating some of the above private cloud solutions I settled on AjaXplorer.   Here is my previous blog post about installing it on a Raspberry Pi.   It gives me access to my files from my mobile with a nice client interface.   I can access my files with a browser if need be.   And I will be able to sync files to my desktop once the desktop client is released.

So I now have a headless Raspberry Pi installed in my house running off a phone charger using maybe $15 worth of electricity per year.   Plugged into that is a Western Digital 4TB USB hard disk.   The Raspberry Pi has three primary services running on it being Samba for local file access, AjaXplorer for private cloud file access and Deluge for the odd Bit Torrent file I need to download.

I am still a user and fan of Dropbox.   I use the Camera Upload feature of the Android Dropbox client.   It allows me to share files with other users of Dropbox.   It also lets me share files to non Dropbox users through the public links saving my home upload bandwidth.   But I realized through this whole process that I didn't need a cloud storage solution, I already had one.   All I needed was easy access to it.

I will continue to be a big fan of Evernote.   It is perfect for information access on your mobile devices and desktops.

If you know of any other private cloud storage solutions I have not looked into, please comment below.

[Update - 2013-07-18] -  I have added to my Private Cloud Storage solution and blogged about it here.